Please make sure that your loudspeakers have a safe stand on the floor. According to the floor material please follow the recommendations: A deep carpet makes it necessary to use the spiked which are supplied with the loudspeakers. The mounted spikes should go through the carpet and touch the ground. The entire weight of a loudspeaker will be focused on the four points of the spikes which ensured a very safe stand for the loudspeakers. Please be careful with the handling of the spikes. Careless usage may cause painful injuries For soft floor surfaces like PVC or Wood, please use the supplied spike cups underneath the spikes which will avoid any damages on your floor ground.
• Magnetic fields
Every dynamic loudspeaker creates a magnetic field which is responsible for the drive of the speaker cones. Very low dose of these magnetic fields could be measured outer most loudspeakers in the market. These fields are not critical for any human being.
1. Do not place the speakers in the near of a tube TV set. The magnetic fields could cause colour interferences on the screen. Keep a distance of 50 cm minimum.
2. Avoid to put magnetic tapes, credit cards, audio tapes ore other magnetic data mediums on top or in the direct near of the loudspeakers.These devices could be damaged
• Overloading/Defect
Please avoid to overpower your loudspeakers by long term high volume sound sessions. Your loudspeakers are sensible devices which are constructed to reproduce highest quality sound. They should not be used for public address systems. The warranty of the loudspeakers is not covered for improper usage. Please note that loudspeakers could also be damaged by powering with not suitable amplification providing distortion signals. Choose a high quality amplifier which fits to your loudspeaker or ask your qualified hifi dealer for recommendation. He will be able to find suitable hifi equipment.
2. Mounting Veritas
Be cautious with the mounting of your loudspeakers. Remember that a good mounting will have a positive impact on the sound quality. You will need following tools: - Screwdriver (to screw the bottom plate to the cabinet) - 14mm wrench (to fasten the nut for the spike) • Bottom plate After unpacked please put the loudspeaker upside down. To avid scratches on the veneer we recommend to put the speaker on a carpet or on a soft cloth. Put the bottom plate on the cabinet so that all four supplied screws could be twisted in the nuts of the cabinet. • Spikes If you would like to place the loudspeakers on a solid floors (concrete, flagstone), for mechanic isolation please put them on the supplied spikes. In order to get a good mechanical isolation the points of the spikes should go on the concrete of the floor (through the carpet). For mounting the spikes you should please also use the four nuts for a tight fixing. After you finished this process the loudspeakers you could return the loudspeakers and put them to the desired position. Be careful with the spikes which could cause serious injuries. After the final positioning you should equalize Make a fine tuning of the height of the spikes so that the loudspeakers have a safe stand and finally tight the spikes with the nuts. Due to the usage of the spikes the energy of the cabinet resonances should be lead to the solid floor. On soft wooden floors this effect is undesired because the floor could enforce the resonances. In this case you should use rubber dampers which isolate the loudspeakers from the wooden floor. For rubber dampers please ask your hifi dealer.
3. Positioning of the Loundspeakers
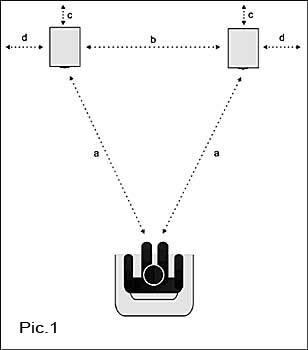
A good positioning of the loudspeakers is direct connection with the acoustic of the room. The original chosen spot might not be the best one in terms of the sound quality. If you are free in choosing the position of your loudspeakers we would like to give you some recommendations which may improve the acoustic of the room and may give you some hints or the best loudspeaker location. • Room acustic The acoustic of your music room has a big impact on the sound result of your hifi system. The realised sound is an addition of direct waves and various reflections. The correct timing and the intensity of the joint of direct waves and reflections is very important and could be manipulated by certain activities. Following settings have an impact on the sound: Size and geometry of the room, material on the walls, floor and ceiling, interior of the room. Direct waves are the straight spreading of the sound from the speaker to the ear. These waves in addition with the sound reflections from the walls, ceiling and the floor makes the picture of the reproduced music . The correct mixture of direct waves and reflections is responsible for the quality of the realized music. To avoid time incorrect reflections, do not place the loudspeakers too close to the side walls. Otherwise the reflections would meet the ear out of phase which would provide a wrong image of the music and would harm the neutrality of the reproduced music (comb-filter-effect). Standing waves arise from multi reflections in the room. You would realize this effect hearing a very non precise bass without any definition. Depending on the chosen position of the loudspeakers the bass sound could be too loud and non precise or too calm. Moving the loudspeakers just a few centimeters could make a big improvement on the sound. Due to individual room characteristics it is not possible to give straight setup advices. The fine tuning should be done in small steps of changing and listening. Too strong sound reflections could cause an "echo effect". The music would have no definition and the bass could be non precise or even subtracted. In this case you should try to work on your interior by using a carpets, curtains and furniture for a better damping of the room acoustic. • Placement (Pic.1) The distance of the loudspeakers side by side (b) should not be wider then the distance to your favorite listening place (a). The distance to the side walls (d) should be wider then the distance to the back wall (c). Give your loudspeakers the possibility to "breath". Parts of the low frequencies will flow out of the back side bass reflex tunnel and should get reflected by the back wall to the listener. The distance to the back wall (c) should be between 10 and 50cm. Avoid a placement right in the corner of the room.
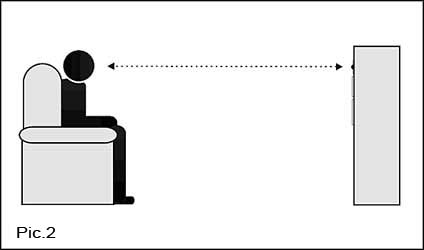
The best possible listeners position for the optimal sound quality is being shown in the sketch 1 (Pic.1) and described before. You should take this position if you listen very intensive to the music. Small divergences will give minor changes on the sound quality which could be neglected in most situations. Depending on the acoustic of the room it could be positive to twist the loudspeakers 5-10 degrees toward the position of the listener. The result on the sound could be huge, but depends how the waves reflect on your side walls. You should also notice that the best position to listen to loudspeakers is when the ears is on the same high level then the tweeter (Pic.2). The sound will go straight to the ear.
4. Align of the loudspeakers
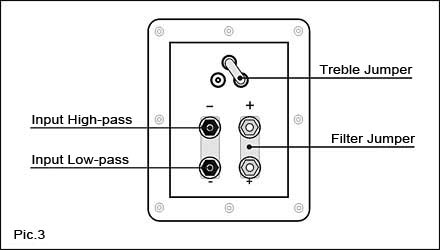
Before you connect the loudspeakers with your amplifier, please switch off all your hifi equipment. Use only high quality loudspeaker cables. For the internal wiring of your loudspeaker the Phonar MSR-cable is being used. For the external link we recommend the same quality of cable. Please ask your Phonar dealer. All Phonar loudspeakers are equipped with a high quality loudspeaker terminal (Pic. 3), which allow the usage of big square cable. Please be careful with the correct poling on the terminal and the amplifier.
A color mark at the cable and at the binding posts of both loudspeaker- and amplifier terminal gives an advise for the correct connection. The length of the cable for the left and right channel should be about the same. Phonar recommends the usage of high quality Banana plugs which will give a good contact and a safe connection of the cable with the terminals. You could also connect the cable direct with the terminals. Open the screws of the terminal so that you can see borings completely. Twist the de insulated cable ends and put them in the borings. Now screw the terminal posts tight.
• Stereo Wiring
For a most common stereo wiring use the lower pair of binding posts and keep the jumper in usage ( Pic.3) which are responsible for the signal supply of the low filter where maximum power is needed. The jumpers will also supply the other frequencies as well.
• Bi-Wiring
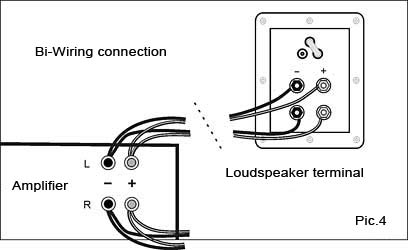
Your loudspeakers offer a strict crossover separation of high- and low- pass filter. You have the option to drive both filters wired individually in order to avoid negative signal impacts on both filters. Disconnect the jumpers and connect both terminal posts separately with the outputs of the amplifier (Pic. 4)
• Bi-Amping
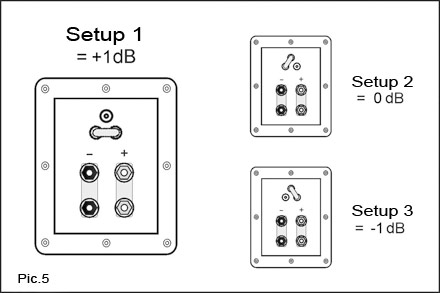
Both terminal posts are supplied with separated wiring (see Bi-Wiring) but also with separated amplification. This high effort will provide the clearest signal for the loudspeakers. Please note that in some cases a bi-wired set driven by a high class stereo amplifier will be a better solution then a bi-amping system with two medium class amplifiers. Treble adjustment You have the option to adjust the treble volume of the tweeter due to the jumper in the upper section of the terminal. The human ear reacts very sensible on high frequencies. Harsh treble is generally noticed as a not comfortable sound. With the treble adjustment you could choose a suitable volume setup which fits to the room acoustic and to your personal taste.
The position 2 generates a linear setup of the tweeter. Position 1 and 3 changed the volume of the tweeter by +1 resp. -1 dB.
5. Before the first usage
Please check all connections on the loudspeakers and on the hifi equipment before the first listening. If you have doubts in any way, please read the instructions once again or contact your hifi dealer. Turn the volume knob on a low volume. Now you could turn on the electronic and start to enjoy the music.
6. Burn in
Your loudspeakers need a burn in time of about 48 hours. After that period you loudspeakers are ready for the best sound performance. The sound tuning and the final placement should be done after the burn in of the loudspeakers. If you use a "pink noise" signal for the burn in time all frequencies are driven on the same level. Please ask your hifi dealer for a burn in CD with a "pink noise" signal, or you could get this signal by using a non defined radio tuner signal (between two stations). If you don't have access to "pink noise signal" you could also use normal music signal which would only take some more time to get the speakers ready. Your hifi system consists of several units. The weakest part of your system is responsible for the quality of the entire hifi set. All parts of your system should be chosen very careful. Use only high quality units which harmonize with each other. Ask your hifi dealer for further recommendations. Speakers sound better without the front grill which should only protect the drivers from damages.
7. Care/Inspection
Please follow the hints in order to keep the quality of the optic and the sound of your loudspeakers:
• Care
The pores of the wooden elements have a closed surface. Both wooden parts and the velvet like front should not be cleaned with any sort of liquid. Use a dry and dust free cloth only. Do not use any chemical substances.
• Inspection
3-5 weeks after the installation, please check all screws on the front panel and tighten them carefully if necessary. Also check the connections on the binding posts and tighten tem if necessary.